
HTB Mirai Writeup
Mirai is a different, but interesting type of HackTheBox machine as it’s in my opinion, more CTF like than pentesting becaise it also includes some forensics/reverse engineering work. The origins of this box is interesting as the name referes to a botnet named Mirai that was able to spread onto other systems and infect them to grow the botnet.
Enumeration
To start off, I do: nmap -sC -sV -oA mirai 10.10.10.48. Here’s what was outputted:
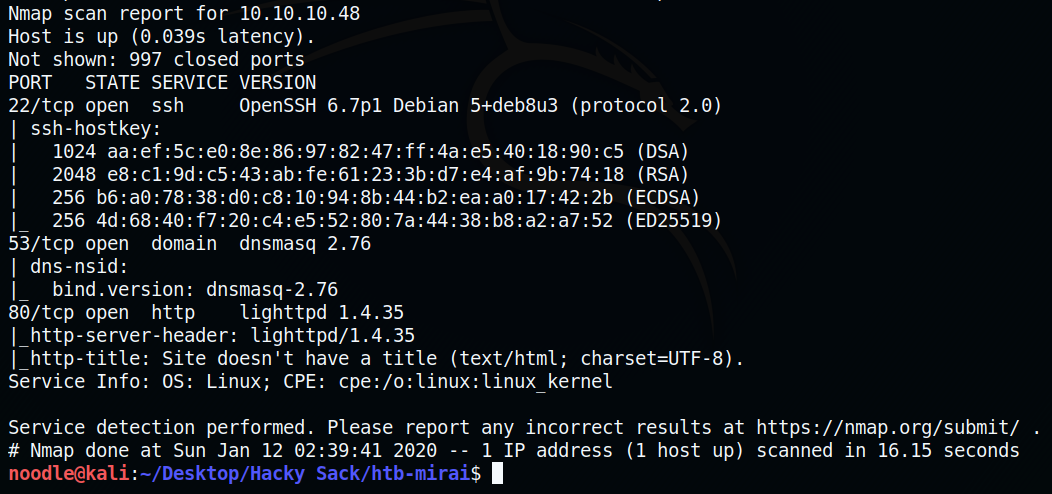
There are a few ports open:
Port 22 which is an SSH server. Currently we have no creds we can try.
Port 53 which is a DNS server. Doing some research about DNS:
Port 53 is used by the Domain Name System (DNS), a service that turns human readable names into IP addresses that the computer understands.More specifically about dnsmasq:Dnsmasq provides Domain Name System (DNS) forwarder, Dynamic Host Configuration Protocol (DHCP) server, router advertisement and network boot features for small computer networks, created as free software.Port 80 which is a webserver.
Checking out the main page of the website:

We can verify that the nmap scan is correct the main homepage is a blank HTML page.
Next step is to run a gobuster scan to find any potential directories: gobuster dir -u http://10.10.10.48 -w /usr/share/wordlists/dirbuster/directory-list-2.3-medium.txt.
(Explanation of the code above): gobuster will run the application. dir is the mode that we’ll be using gobuster for (it will brute force directories). -u is the flag that the next string is the URL. -w is the flag that the next string is the wordlist that we’ll be using.
Here is the output of running that gobuster scan:
gobuster discovered two URLs:
http://10.10.10.48/adminhttp://10.10.10.48/versions
Visiting the /admin directory:

We see there’s a webpage that has something called Pi-hole.
From the Pi-hole wiki page: Pi-hole is a Linux network-level advertisement and Internet tracker blocking application which acts as a DNS sinkhole (and optionally a DHCP server), intended for use on a private network. It is designed for use on embedded devices with network capability, such as the Raspberry Pi, but it can be used on other machines running Linux and cloud implementations.
So from this page, it is learned that Pi-hole does advertisement and internet tracker blocking on a private network. It is also learned that it’s designed for devices like a Raspberry Pi.
Getting a shell
Doing some research I come across a an article with SSH info into a Raspberry Pi. It says the default credentials are
Testing out those credentials:

We get a shell.
Doing an id check reveals we aren’t a root user.
Wandering out and eventually checking out the Desktop directory, we get the user flag:

Though doing a sudo -l command to list commands that are allowed on our current user. Doing so results in this:
This means we can run sudo su - to switch to the root user without a password.

Doing a ls -la check, there’s a root.txt flag… But cat root.txt outputs the following message:
To check the devices (things that can read/write files like a hard drive or USB stick) we can do lsblk which stands for list blocks. Here’s what it shows:
We can also do df to see more information about the disks. Man page here
We see there’s a 10MB disk located at /media/usbstick.
Checking it out, there’s another message in damnit.txt:
Recovering the root flag
Doing some research, I found out on this stack exchange question it is found out that you can recover some deleted text from a device. Basically we can read the filesystem to see if there’s anything that was overwritten/deleted.
From the df and the lsblk commands, we see that the usb filesystem is on /dev/sdb
Doing a similar approach to the stack exchange question, I did strings /dev/sdb to view the printable characters in the file. Doing so outputs something that resembles a flag:

Inputting that hash reveals that it is indeed the root flag!
Another alternate way to recover the file that I learned from IppSec’s video writeup is that we can utilize xxd to view the hex dump of the device.
Though since it’s deleted and mostly overwritten by a bunch of 0’s such as:
It will output a bunch of similar lines. Thus we can pipe (|) the output against grep to remove those lines that were overwritten with 0’s.
Here’s the command I did: root@raspberrypi:/media/usbstick# xxd /dev/sdb | grep -v "0000 0000 0000 0000 0000 0000 0000 0000"
(Explanation of the command above): xxd /dev/sdb to view the hex dump. Throw the output to grep. From the grep man page we see we can use -v to invert match: Invert the sense of matching, to select non-matching lines.
At the very bottom it outputted this:

Again, we see the root hash.
Flags
user: /home/pi/Desktop/user.txt
root: See above to get hash
Sources
Last updated